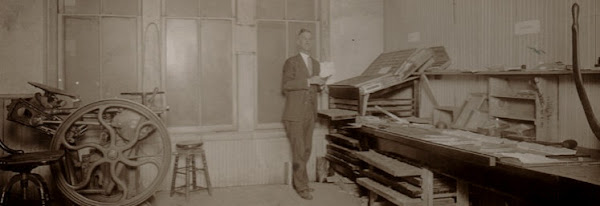
I finished the restoration of the etching press last weekend but couldn’t get my camera, the Sony dinosaur with 3 ½” floppy disks, to work until today. I’ve actually been doing some letterpress printing in between but more on that later. I’ve got a few Before And After photos below as well as some detail shots. The Before is on the left and the After on the right. The quality as usual is poor and in some cases doesn’t do the cleanup job justice. For example, the face of the large cylinder on the bottom was completely covered with paint, which it should not be for use. It is now completely clean. The same is true for the bed and the cylinder, in addition to which they were both covered with rust under the paint. They are now down to bare metal again. In fact, all of the bare metal and bronze bearings that you see were once covered with paint, dirt, and grease.

Speaking of grease, I found on this press what one often finds on old machinery: grease in the oil bearings. If any of you have old machinery that requires regular lubrication remember that the engineers who design machinery design bearings for a certain type of lubrication and that you can’t just decide on your own to change it without consequences. Bearings designed for oil have channels and reservoirs and oil holes and are sized to work with oil. Bearings designed for grease are specially designed to do so and have appropriate grease caps attached, etc. Some people put grease in bearings designed for oil thinking that the grease will last a long time and they won’t have to oil it. This is completely wrong, especially the idea that greased bearings require no attention. Except for the first day or so, the grease will not keep the bearing surfaces coated with lubricant and the bearings will wear. That was the case with this press. Remember that bearings designed for grease will have cups with screw caps or grease nipples like the universal joint bearings on your car. The cup type will have grease in them and periodically the caps must be screwed down a bit pushing more grease into the bearings. In the case of nipples, a grease gun is used to pump more grease into the bearing. Bearings design for oil will either have open holes or caps with hinged lids. More rarely, there are oil cups with glass reservoirs that can provide a constant drip of oil and there are a few other types of automatic oilers. But the average printer will not likely encounter these. The thing to remember is to identify whether or not the bearing should get grease or oil and then use the correct lubricant; don’t substitute one for the other. If someone else has done so clean out the bearing completely and then use the right lubricant.

NOTE: In the above After photo of the press, that brown thing hanging down that almost looks like an extension of the cylinder blanket is actually the window curtain that just happens to be lined up with and the same shade as the blanket.

Two of the bed’s guide/support rollers were broken and have been replaced with new, machined copies. Most of these rollers were rusted or otherwise frozen but everything was disassembled and cleaned and now turns smoothly. Etching presses use felt blankets, usually three long ones of different thicknesses on top of one another. They perform several functions including soaking up sizing from the wet paper, pressing the paper into the incised lines of the plate, and helping the cylinder push the bed and plate through the two rollers. This particular kind of press has a D-shaped (half) cylinder and the top blanket is attached directly to it as the photo above shows. The other two felt blankets are held in place at the rear of the bed by the bars and thumbscrews shown in another photo below and pass under the cylinder. I removed those two for the photos. The blanket on the cylinder gets a lot of wear from pushing the other felts through the rollers and is therefore usually woven felt in contrast to the pressed felt from which the others are made. I was fortunate to have a piece of used woven felt that was once the cylinder blanket of an old galley proof press. It was filthy and is still stained as the photo shows. But I cleaned it by hand with Woolite and it is now clean and perfectly serviceable, if dark in color.

The above photo shows the air piston that helps slow the bed down on its automatic return to the forward position. I described in a previous post how that aspect of the press works. I had to make a new leather cup washer as the old one was almost completely destroyed. It was surprisingly easy to do and is basically the same kind of mechanism found on old hand-operated water pumps. There is also a rubber bumper directly above where the piston goes into its tube. The rear of the tube has an adjustable cap with a hole so that the amount of air exhausting out and thus the speed of the bed’s return can be controlled. Pretty clever, eh?

In the above photo if you look carefully towards the bottom center you can see the counterweight that pulls the bed back to the forward position. It is suspended from a leather belt that runs over a pulley on the rear support roller shaft. You can see the brown belt in the photo of the air piston. I made the counterweight from a large slug/cylinder of brass I had laying around. It’s about 3” in diameter and 8” long and weights about 25 pounds. I wrapped it in leather with a large wooden dowel so I could easily attach a screw hook for a D-ring on the leather belt.

In one of my previous posts on this press I described the mechanism by which the felts are automatically held up and out of the way. I did hook things up so it would work but the felts I have, scraps I had laying around, are not quite long enough for this to work too well, though it did work. When I’m able to replace the felts I’ll hook it up properly.
A few other things I did: I made a new arm for the wheel. One had gone missing sometime in the distant pass and a wooden replacement had been fabricated for use while it was a display piece. Fortunately I had a length of 1-inch bar stock and the correct screw-cutting die on hand so after some grunting and groaning and plenty of smelly cutting fluid the job was done. Cutting a 1-inch diameter thread by hand is not that easy. I also made wooden runners for it. I also decided to place pieces of leather between the upper cylinder’s bearings and the iron pressure pads. I’ve seen this and read about it in a number of places and it seemed a good idea. Supposedly it provides a slight amount of give and avoids undue strain on the press. Maybe. But it certainly doesn’t hurt.

I’m very happy with the press and am making some more test prints. I can’t wait to incorporate what I can do with it with my letterpress work. And I’ve got so much printing to do now, both letterpress and intaglio, that I will be quite busy. No more restorations for a while!


 My hiatus from printing and printmaking seems to be at end and I’ve recently entered an intaglio exchange in order to insure that I have a specific goal in mind to bring me fully back into the swing of things. I work full-time and, being single, must take care of the many household and other tasks myself. I found the need to focus my limited spare time on my health, specifically with regard to physical exercise. Not being interested in sports, I turned to bicycle riding knowing that this would eventually tie in with printmaking as I could ride where I could not walk or drive to get subjects for the copper plate. I now have a restored bicycle and have started regular riding. At this time of the year my riding has been greatly curtailed but the way has been paved and the journey begun so now it’s back to the stone and the press.


