Tuesday, December 29, 2009

Playing Tag

I’m about 95% finished with restoring the Kelton intaglio press. Later I’ll post more about the adventure of cleaning and adjusting it, which turned out to be a bigger job than I had at first suspected. This was mostly because after it left its useful life as a working press it lay somewhere getting rusty before the next owner applied black paint to every surface whether it was dirty, rusty, greasy, or was supposed to be painted or not. They then used it for a display piece which is also what the next owner intended for it when he got a lobby. Since this lobby never materialized, I now own the press. The net result is that many things were frozen and a lot of paint had to be removed which revealed a lot of rust that had to be removed. In the end it was fine but time consuming.

Anyway, I was so anxious to try something I had never done before, namely intaglio printing, and so much wanted to see whether or not the press actually worked that I threw caution to the winds. After final adjustments Sunday afternoon I had things just together enough to pull a proof. The problem was that I had virtually nothing that one needs to do this; nothing proper that is. I had no intaglio ink, copper plate, tarlatan rag, hot plate, or blotting paper. And I had only watched some Youtube videos and read about the process in a few vintage books I downloaded free online. But fools rush in where angels fear to tread.

I did have a few scraps of felt and some 100% cotton paper however. Also some rubber base letterpress ink and a couple 2” diameter brass key ID tags that had been stamped with numbers. Into one of these I made some scratches to try the drypoint technique. The end results can be seen below. Keep in mind that I didn’t wipe off the (wrong) ink properly and that punched numbers are not the same as etching or engraving; also that I wet the paper too much and didn’t blot it properly; and top all of that the fact that I was rushing a bit to get it done after a long day. They may be some of the worst intaglio prints ever but in the above context didn’t come out too badly for some quick test prints. I certainly got a thrill from the “accomplishment” and the knowledge that the press actually worked. If you look closely you can see my backwards initials in the little scratched box in the second photo. These lines are extremely fine and it surprised me how well they showed up.


I’ll detail in another post the last stages of the restoration and have some photos of the restored press as well as a few more things I learned about it.

Sunday, December 13, 2009

Sign Of The Time

The time in this case is somewhere in the latter half of the 19th century. I found a little time capsule in the Kelton copper plate press today. But let me lay some groundwork.

Presses of this type, especially older ones, needed the lower roller adjusted to come into contact with the underside of the press bed. This was done quite simply using shims under the bronze bearing blocks. Any hard, stable material will do, thick and thin pieces being used as required. Wood and paper were sometimes used but these materials are dynamic, expanding or contracting with changes in the humidity, and therefore not the best. A possible exception would be oiled paper such as tympan that is both hard and stable. Steel, iron, copper, and brass were all more appropriate choices.

I had disassembled the Kelton as much as possible with the exception of the lower roller. I was able to remove the bearing blocks and shims but removing the roller itself would require taking the main frame completely apart. This wasn’t necessary as I could clean everything with the roller in place and supported by two pipes. I cleaned the bearing blocks today and the shims and it was here that I made my discovery.

The press has been moved at least four times in its life including from the factory to its first owner. Adjustment of the roller would have taken place after that first move and I think I know enough about the subsequent life of the press to state that no one has likely changed this initial adjustment. The roller is very heavy and holds the shims in place quite securely. By the time I got it the shims were pretty much glued in place as well with the gunk of the ages and the paint one of the previous owners had sloped on to make it shiny looking. Further examination bore out that they were certainly very old.

On both sides they consist of small steel plates, a few brass pieces of two different thicknesses, and on one side two pieces of oiled paper, possibly tympan. While the steel plates were for the most part unremarkable, one of them contained some evidence of the craft for which the press was intended. An example of this craft in action can be seen in the circa 1860 illustration below of the press room of the American Bank Note Company in New York City.


Copper and other plates used for intaglio printing have a bevel filed at the outer top edges, sometimes at a 45-degree angle but more often one less steep. The purpose of the bevel is to keep the otherwise sharp right angle of the edge from cutting into the paper under the great pressure exerted during printing. Anyone who has seen an intaglio print will likely remember that the edge of the plate is visible at the outside of the image. Even today plates do not come this way from the factory but the printer files the bevel himself. What I found on one of the steel shims was this hand-filed bevel.

The plate is 1/8” thick, a standard gauge for printing, and approximately 1 ¾” by 2” though not a perfect rectangle but a rather accurate parallelogram. As you can see from the photo, there are two holes drilled into it and it has numerous scratches in it. On one side the bevel is a fairly consistent 1/16” wide while on the reverse the edge has only been filed slightly, a distinct bevel but just enough to remove the sharp edge.


I can’t explain the reason why this small plate was prepared as if it was to be used for engraving or etching a print on it. Perhaps it was done for practice. Or perhaps when making a shim for the press the force of habit took over when removing the sharp burr at the edges. I do plan on reusing the original shims now that I’ve cleaned them and if further adjustments are needed simply adding to those. But I’m tempted to replace this one with a new piece of steel.

The stories this press could tell and in some ways is telling, eh?

Sunday, December 6, 2009

Look Out! Here Comes The Spider-Man.

If Peter Parker had wanted to be a print maker of a more ancient variety, he may very well have chosen intaglio as his medium. Had he done so he would have needed a copper plate press, sometimes called a spider-press because of its large spoked handwheel. I don’t spin webs of any size or catch thieves just like flies but I am in the process of restoring a vintage copper plate intaglio press. Eat your heart out, Spidey.

This press was built by the M. M. Kelton Company of Brooklyn, NY sometime from the 1850’s through the early 20th century. I haven’t been able to pin it down closer than that and have found little direct information on these presses. However, by doing a lot of internet research, piecing together tidbits of information including that gleaned form vintage photos and etchings, and disassembly and studying the press as part of its restoration, I’ve learned quite a bit. For one thing, this style of cast iron mass-produced press was used extensively by bank note companies as well as the U.S. Bureau of Engraving and Printing throughout the latter half of the 19th century. One of the largest users in my own area was the American Bank Note Company which had a printing house in Brooklyn, NY in addition to it’s headquarters in Manhattan. Brooklyn is of course where my press was made. Below is a photo of the ABNC’s now closed Brooklyn plant as it looks today.


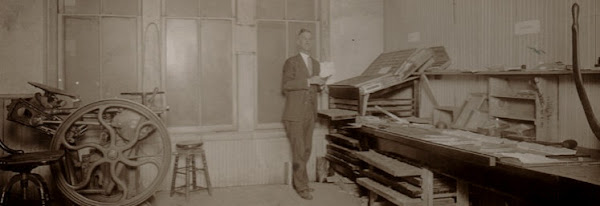
Another photo shows these presses in operation and there are dozens, maybe hundreds of them churning out paper money, certificates, stamps, and all manner of financial documents. These presses were not designed for artists but for production. The top cylinder was in fact only a half-cylinder, its cross section appearing as a D-shape. The bed had a weight attached to the back that in conjunction with a pulley kept the bed in the forward position. When turning the handwheel an adjustable cam on the right side of the cylinder engaged with an adjustable mating cam on the bed which started the bed through the two (upper and lower) rollers automatically. Intaglio presses use three felt blankets laid over the paper and plate in order to cushion the pressure and press the paper into the incised plate to pick up the ink. On this press, the top blanket is attached to the top cylinder and a bar at the rear of the bed holds the other two blankets that extend along the bed under the upper cylinder.


Additionally, there is an iron frame above the press with a cross bar on which is a pulley. The blankets attached at the rear of the bed are held together at the front end where a rope is attached that goes over this pulley and on the end of which is a weight. When the press is at rest the bed is in its forward (start) position and the front end of the blankets are held up in the air out if the way so the plate and paper can be laid on the bed. Then the handwheel is turned, the bed is engaged and goes between the rollers making the print at which point it is automatically released merely by continuing to turn the handwheel. The bed automatically returns to its forward position and the blankets are automatically drawn up out of the way so the proof can be removed. Anyone who has operated an intaglio press will recognize the time saved with this arrangement. While not necessary for artist’s proofs, it’s a definite advantage for meeting production deadlines.


The press is not large but it is heavy. This is partly because the upper cylinder is solid, and even though the lower cylinder is a hollow casting it is very large and has thick walls as you would expect on an intaglio press because of the pressure exerted during printing. Modern presses have rollers about the same size top and bottom but it was common in the 19th century for the bottom roller to be much larger than the top as is the case here. Altogether the press weighs between 300 and 400 pounds, though that’s just an estimate. In practical terms it will print a plate up to 8” x 10”. The presses most recent use was as a display item in a print shop in Long Island City, i.e. Queens. It had been coated in black paint right over any dirt and rust so it would be nice and shiny. It needs to be completly cleaned and adjusted, the paint taken off where it shouldn't be, and some minor repairs made but otherwise nothing major. I suspect it came from the ABNC in Brooklyn when they closed that plant which is not too far away from its display post.


I have several letterpress printing projects that are a priority at the moment but I’ve begun the restoration process on this press and hope to be able to experiment within a month or so. I’ve never done intaglio before so it will be interesting. Besides limited edition proofs, I want to use it to produce artwork for my letterpress journal and also for artistamps that I can perforate on my Rosback perforator. I’ve seen some examples of work that is a combination of intaglio and letterpress so there are a lot of options, even if I don’t have radioactive blood.