Showing posts with label Shop. Show all posts

Saturday, June 6, 2009

Spooling Around

All right, that's perhaps the worst heading ever but since it's for a relatively unnecessary post, it's actually appropriate. I just wanted to put up a photo of the label on the spool of stitching wire that came with the stitcher. It's a wooden spool and the vintage label is pretty interesting. The label has the imprint of the manufacturer who made the stitcher but while gluing it back on I noticed that it had actually been placed over the original label. I couldn't see enough to determine the manufacturer of the wire.

BTW, I'm still looking for some additional spools, partial or full, wood or plastic, whatever gauge. I know I can buy them new but this poor printer is hoping to save some money if possible.

Tuesday, June 2, 2009

Wired!

Many thanks to my friend Alan Runfeldt of the Excelsior Press for having numerous printer's supply catalogs laying around and allowing me to borrow them. In two I found ads for my No. 8 National wire stitcher.

The top scan is from the circa 1950's New York Type Distributors catalog. They were located at 579 Broadway in New York City: just phone Canal 6-6767.

The second scan is from the Zimmer Printer's Supply catalog from 1969. Their main office was at 225 Varick St. in New York City with a sales office in Boston and an executive office in Hawthorne, New Jersey. Orders can be placed by cable using the code: Zimsupco

Don't you just love old catalogs? The information in these two ads tells me virtually everything I need to know regarding the stitcher. Capacity, speed, and clear enough graphics to allow me to reconstruct accurately the table gauge. Fortunately one of the end slides was still attached so I can use it for scale and general construction.

I now need some wire. If anyone has any 5 pound spools of wire they don't need, aren't using, or wish to donate please let me know. Older wooden spools are especially welcome!


Thursday, January 8, 2009

The Paper Chase

Rule One: Never turn down free paper.

Rule Two: Keep your eyes open for free paper.

Rule Three: Different kinds of printing, type, cuts, and ink require or at least work better with different kinds of paper. See rules One and Two above.

Rule Four: The fact that the paper is free will not improve your printing, but it doesn't hurt.

As you can see from the photos, I've been following the above rules. In fact, I had to recently build the upper shelves on the left of the first photo to make room for more. The large sheets of paper (and metal shelves) to the lower left in the first photo came from the garage print shop where I got my first press at the time I was just starting out two years ago. More came from various sources usually in conjunction with picking up something else where it was thrown in to get rid of it. There is everything from Kromcote to mimeograph; ledger to bond; book to chipboard; diecut cards to tag. I even came across stacks of pre-printed colored-border award certificates in different sizes. Did I mention some boxes of envelopes too?

I've experimented with a lot of it and can recommend that it is good to have different kinds of paper around. E.g. Cuts that don't print well on one kind will print perfectly on another. I suppose this seems like a no-brainer but I've noticed that there are many printers who seem to use one or two kinds of paper exclusively, usually the ubiquitous Lettra.

The issue of free comes up for a number of reasons. First, I am poor and by rights perhaps should not have printing as a hobby at all when one looks at the prices a lot of printing equipment, especially for letterpress, seems to go for. But where there's a will, there's a way and usually a lot of generous people to help. At least that's been my experience and I'm grateful to all of them. Second, there's a lot of good quality old paper laying around and it seems like a good idea to recycle it this way instead of having it go to a recycling center where it can be made into a lot of modern poor quality paper. Third, it's just plain fun.

Say, anyone in the central New Jersey area have any paper to get rid of...?


Monday, November 24, 2008

De-pressing

It was a busy weekend and somewhat bittersweet. My old C&P 8x12 OS (1893) press was removed from the shop and hauled away to make room for my new C&P 10x15 OS (1892) that was brought into the shop the same day. I'm very happy to have gotten this press and it will be much more useful but the 8x12 was my first press, I spent a lot of time restoring it, and I liked it quite a bit. Sigh.

The weekend began Saturday morning (of course) when I drove with my friend Alan to northern New Jersey to pick up some presses and other print shop items. Alan does what he calls Letterpress Rescue as part of the Excelsior Press Museum. People cleaning out their parent's house or closing down their print shop often find Alan through his website and ask him if he can come and get their presses and equipment. Sometimes selling the items isn't an option for people and presses are often in the basement or even the attic where scrap metal dealers seldom venture. Instead of them going to the smelter, Alan adds the items to the museum shop or sells them so they will continue their useful lives and help fund the museum.

Thus we found ourselves hauling one C&P 8x12 NS out of a basement and a second out of the garage. In a shed there was some type in cases and about eight 5 gallon buckets of Linotype slugs, leads, and misc. heavy metal. Here's a bit of news: lead is heavy. Both presses had Kimble variable speed motors and were complete and in good shape, though in need of cleaning. Our adventure took the better part of the day and we got home (Alan to Baptistown and me to Milford, NJ) about 5:30.

Sunday morning we were off to the house of Alan's former print shop teacher in east-central New Jersey, a very nice man now 80 years old. Over the course of several weeks we had removed from his basement a C&P 10x15 OS, the press I am trading up to, two 1940/50's vintage Mutilith offset presses, a NuArc platemaker, Challenge paper cutter, type in cases and all the other detritus of a print shop. There was another Challenge electric cutter already in the garage along with a brand-new in the box Spinnet paper drill. Because we had prepped all this previously and had a rental truck with a hydraulic lift gate it didn't take us long to load up.
The next stop was my house where my 8x12 press was waiting on my back porch. On the truck it went and off came the 10x15 and right into the living room. Then back to Alan's shop where we unloaded everything and put it with the haul from Saturday. All in all it was a busy weekend. I plan to begin cleaning my new press this weekend and will hopefully have it running and printing by Christmas. I'm very anxious to move from setting up the shop to printing. The press is very nice and came with 6 chases, a Kimble variable speed motor, and a long and interesting history of job work.

The first photo below shows the two NS presses in front of my OS press in the barn where Alan has his shop, all lined up like soldiers on parade. The second shows a closeup of my old press. The third shows the main frame of my new press after we got it into the living room, otherwise know as my shop. As you can see, it needs some cleaning.

Let me mention that the three 8x12 presses are for sale. I can give you particulars or you can write to Alan directly about specifics and prices through the Excelsior Press website, a link to which is at the right of this blog page. In addition, the two Multilith presses are for sale, one is for parts but the other is complete and running and there are many, many (did I say many?) accessories, blankets, an extra brand-new motor, etc. that go with it. Alan's teacher used it regularly and had large stocks of all needed supplies. Also, both Challenge paper cutters are for sale, they're complete and nice. The paper drill and platemaker with several boxes of new carbon rods and vacuum pump are also for sale. As for me, I'm getting some type, cuts, and ornaments.

So it's not so de-pressing after all, eh?
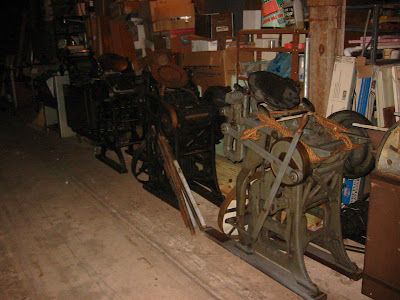

Soldiers On Parade


Should Old Acquaintance Be Forgot


New Kid On The Block

Monday, October 27, 2008

You Can Bank On It


I completed the bank top for my type cabinet tonight and brought it home from work. I still have to apply a finish to it which I'll start in a day or two. Normally I use orange shellac for anything I make that I want to match older furniture because that was the usual finish used. My Tracy cabinet is no different. But because in this case the bank is not just a separate piece of furniture but will be part of the old cabinet I will likely stain the bank first so that when I apply the shellac it will more closely match the patina of the base. I'm going to make some tests on scrap pieces before I decide.

The old cabinet is made out of ash and since we didn't have any at work, or any white oak that I liked and which would have been something of a match, I used some hickory which we did have. The grain is very similar and the darker color in some of the boards will aid in matching it to the older base.

I debated with myself over exactly what type of bank I wanted. One with the upper part elevated above the lower and taller so as to support a full-sized case or like the one I finally decided upon. I chose this style because I wanted a reasonably deep lower surface that would accept 3/4 cases which are often deeper than full-sized. Also, I know it will be extremely unlikely that I will ever need to have a separate upper case font above and a lower case font below. More useful will be to have a lead and slug case and perhaps a quad and space case on the upper level. This type was also less time consuming to build, a not altogether irrelevant consideration.

I made the lips at the front edges of the upper and lower levels 1/2" tall so case handles would clear and so they wouldn't interfere when I tie up a form on a galley. I will likely attach a small strip of wood to the lower right corner as a galley stop.

Once the finish is on I'll post another photo though it will probably be just as poor as this one. Hopefully I'll be buying a new camera in the next couple months.

Saturday, September 20, 2008

Wheels Within Wheels

There's been a lot of discussion on Briar Press and the LETPRESS mailing list recently about operating a press safely. One of the important factors to consider is the speed of the press. Without a treadle or variable speed motor, running the press at a slow enough speed for safe operation, whether for a beginner or experienced pressman, is not always so straightforward.

To use my press for an example: It came from a print shop where the printer had over 50 years experience. The press had a 1725 rpm motor which gave 36 impressions per minute when belted to the 24" pulley on the drive shaft. Needless to say, this was much too fast for me and probably even for many experienced printers.

The press had no treadle and an expensive variable speed motor was financially put of the question. The answer was to slow the speed down by the use of an intermediate pulley arrangement known as a countershaft. By adjusting the diameter of the pulleys in this setup the speed of the press is adjusted up or down. In this case, the pulley on the motor is a 2" V-belt pulley which is belted to a 6" V-belt pulley on the countershaft. On the end of the shaft is a 2" flat belt pulley which in turn is belted to a 24" flat belt pulley on the press. The motor, 2" and 24" flat belt pulleys came with the press.

The photo below shows my countershaft. I was fortunate in having an old motor mount with a built-in countershaft but a similar setup could easily be made out of wood and with pillow blocks, a shaft, and pulleys purchased from an industrial supplier, flea market, etc. The wide pulley under the belt is an idler pulley to keep tension on the belt and help it wrap around the small pulley better and provide more surface contact. This is not essential but I had it laying in my basement and it works well. I made the base for it out of wood, the same as can be done for the main countershaft and motor mount.

I've read and been told that 14 impressions per minute is a good speed to start for a beginner, or even slower. My press runs at 15 ipm and as a beginner I'm very comfortable with that speed. I thought I would post this to show a less common but effective, inexpensive, and relatively simple option to run the press at a safe speed.


Monday, August 25, 2008

Rules Of Thumb...

...sometimes need clarification. In my last post I wrote that my rule of thumb when restoring old equipment is: less is more. Afterwards I realized that I was painting with too broad a brush. This rule is true as far as painting or refinishing in general goes. However, with any piece of equipment, from a stapler to a press, I invariably disassemble it, clean every part and make any repairs as I go. I remove any and all rust and while not a fanatic about polished metal surfaces, will at least make them bright.

Because my usual method of cleaning involves WD-40, green pads and paper towels original paint tends to stay put and I don't usually find a need to replace it or touch it up even if there isn't much left. But there are those cases such as the proof press where there are only bits and pieces of finish left and it was so rusty that sandblasting was the most reasonable method of cleaning. Complete repainting was therefore the only practical option.

So I hope I've set the record straight. I thought it important to do so because I'm a strong proponent of disassembling and cleaning machinery. Not only does it insure that it will operate the way it should because bearing and other surfaces are clean but you gain an intimate knowledge of the machine. You learn its strong points and areas where parts are worn and perhaps must be repaired, replaced or compensated for during operation. Trouble-shooting problems will be much easier if you know the machine inside and out. No machine is perfect, especially antiques, even when they're restored to full operation. I also find that being able to take pride in your equipment translates itself positively to your work.

I've attached a photo of a lead and slug cutter that was covered in rust on the bare metal surfaces but the paint of which was mostly intact. I took it all apart and cleaned everything including the screws, springs, and snap rings. I cleaned the gunk off the paint but otherwise left it alone. I made the base at work from some mahogany we had laying around.